Create a CI/CD Pipeline with AWS CDK

What is the AWS Cloud Development Kit (CDK)?
The CDK is an awesome step in the right direction for infrastructure as code (IaC). It’s a framework that supports multiple programming languages to define cloud infrastructure that is then provisioned through CloudFormation stacks. As of today it can be used in TypeScript, JavaScript, Python, Java or C#. That is so cool! I can use programming paradigms rather than just declaring stuff through configuration files to setup my infrastructure? Sign me up.
If you’re completely new to CDK checkout the Getting Started Guide in the AWS documentation first. The Getting Started guide will walk you through prerequisites, installing the command line interface (CLI) tool, and the main concepts used when developing with the CDK.
The rest of the article is going to assume you’re familiar with the CDK basics from here on out. I’m also using Python in my examples because it’s what I like. If you prefer another language these examples should be fairly easy to translate into your favorite. The CDK API Reference is excellent and allows you to easily switch between languages when viewing documentation.
Writing the CDK code for the pipeline
I’m going to use the site you’re reading this from as an example for the pipeline setup that we’ll walk through in this article. This site is a static site built using Hugo and hosted from an S3 bucket behind a CloudFront CDN. The goal is to automate the compile of the static code via the hugo CLI, push the new static files to the S3 bucket, and tell CloudFront to refresh its cache so the new content is available immediately.
Start by creating an empty directory in your project and then initializing a cdk project.
$ mkdir cdk && cd cdk && cdk init --language python
Next let’s add the CDK modules that will be used in this stack inside the requirements.txt file. Open the file, add the following text, and save the file.
-e .
aws-cdk.core==1.23.0
aws-cdk.aws-codebuild==1.23.0
aws-cdk.aws-codecommit==1.23.0
aws-cdk.aws-codepipeline==1.23.0
aws-cdk.aws-codepipeline-actions==1.23.0
aws-cdk.aws-iam==1.23.0
aws-cdk.aws_s3==1.23.0
Back to the terminal, activate the virtual environment provided when initializing CDK and install the modules.
$ source ./env/bin/activate
$ pip install -r requirements.txt
Now onto some code. Let’s start off by renaming cdk/cdk_stack.py to better reflect the purpose of our stack. Still within the terminal:
$ mv cdk/cdk_stack.py cdk/pipeline_stack.py
Now open the pipeline_stack.py file and we’ll start setting up our stack. We’ll need to import the modules that we’re going to use for the CodePipeline, the CodeBuild stages, the CodeCommit repository and our IAM role.
|
|
Next, setup the class for the stack and connect to the CodeCommit repository. I’m going to get this value using a Context Variable that can be passed in when running the cdk deploy command when we’re ready to deploy the stack. I’ve also added a catch in case the repo is not passed in to give me a better error message than the default message that’s raised by the CDK if the value of None is passed into the repo lookup function. I created a small helper function so I can use this same strategy on other Context Variable lookups. Still within cdk\pipeline_stack.py we’ll add:
|
|
And the code for the helper function:
|
|
So with this set I’ll update app.py and then run a synthesize to validate that my custom exception gets raised. In the app.py file I need to change the import from the example CdkStack to the new PipelineStack name.
#!/usr/bin/env python3

from aws_cdk import core

from cdk.pipeline_stack import PipelineStack


app = core.App()
PipelineStack(app, "cdk")

app.synth()
Okay, in the terminal let’s run cdk synth without passing in the repo_name construct to see the exception. Great, the output looks like what I wanted to see:
Traceback (most recent call last):
  File "app.py", line 9, in <module>
    PipelineStack(app, "cdk")
  File "./.venv/lib/python3.7/site-packages/jsii/_runtime.py", line 66, in __call__
    inst = super().__call__(*args, **kwargs)
  File "./cdk/cdk/pipeline_stack.py", line 18, in __init__
    "You must pass in a repository name via a CDK Context Variable with '-c repo_name=<your_custom_value>"
Subprocess exited with error 1
Cool beans, so back to cdk/pipeline_stack.py and we’ll setup the pipeline itself. First we need to define the task that is going to run the build. We need this task to install Hugo, compile the static files, and then create an artifact of the static files to be used when the deployment phase to S3 runs. In essence it will create a buildspec.yml behind the scenes. For more information on the different phases and options available within the build_spec see AWS Buildspec Reference
|
|
Next, I setup a buildspec to run a command to clear the CloudFront cache. I was digging through the CDK API documentation to see if there was a better native way to do this with the CDK but didn’t find anything. If you know of a better way to do this please comment at the bottom! I’m pulling in the CloudFront distribution ID via an import from the CloudFormation stack that was used to create the distribution as the infrastructure is not currently being deployed by a CDK stack but still via CloudFormation. I’ll bring in the CloudFormation stack name from a Context Variable and then import the value of the distribution ID from that stack. With the ID of the distribution I can then create a buildspec that runs the aws cli command to invalidate and clear the cache. When creating most services with the CDK it will create the roles for you behind the scenes with a least privilege model to the automated role creation. However, because I’m hacking this in via the AWS CLI we’ll need to create an IAM role ourselves to grant access to invalidating files in the CloudFront distribution.
|
|
The final bit of house keeping before creating the CodePipeline object is to lookup the S3 bucket that is hosting the website so it can be passed to the pipeline and write access can be granted. If I were doing a full environment build out I’d include the bucket creation in the CDK code to not have to pass this value in from the CloudFormation stack in the same way as the CloudFront distribution ID.
|
|
Finally, we can setup the actual CodePipeline! We’ll create an output for the code pulled from the CodeCommit repository and a second output for the generated static web files from the hugo build. Then we can tie it all together in the CodePipeline stages.
|
|
Looks good, let’s test it out!
From the terminal we’ll run synth first to validate:
cdk synth -c repo_name=<code_commit_repo_name> -c cfn_stack_name=<infra_cfn_stack_name>
If everything is in good order the command should output the yml for the generated CloudFormation template that will be used when we run cdk deploy. Let’s do just that.
cdk deploy --c repo_name=<code_commit_repo_name> -c cfn_stack_name=<infra_cfn_stack_name>
Your terminal should show you a table of the security considerations and ask you if you’re sure you want to deploy these changes.
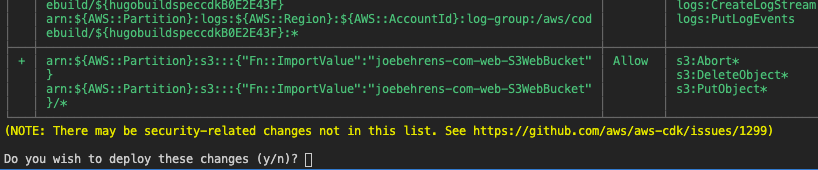
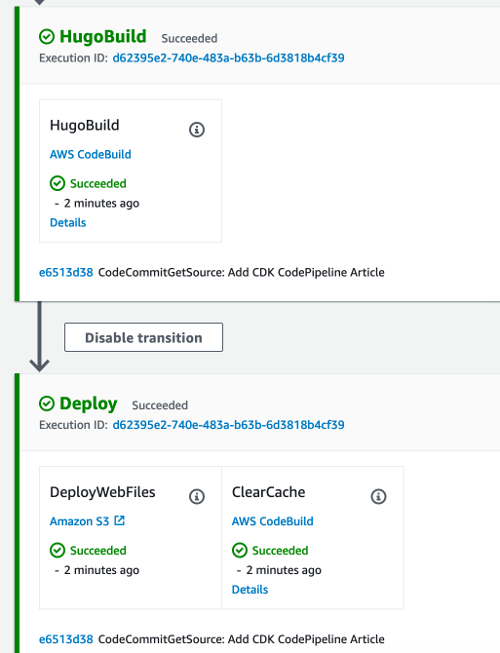
Make sure you review this to ensure there’s nothing happening that you didn’t intend to happen. If it all looks good we can continue. This will create and execute a CloudFormation stack to deploy the defined resources. Once that’s complete the CodePipeline will be available to use and changes to the site will automatically deploy upon push into the master branch of the CodeCommit repository. My final test was pushing this article out 🕶

Final Thoughts
My site is very simple and it’s a development team of 1. The biggest change that I would make if it were a project that required multiple environments would be to add a Construct to app.py to allow for multiple stacks to be created from the same CDK code with parameters passed in to change specific values. This is another huge advantage to CDK. For example, I’d change app.py to:
#!/usr/bin/env python3

from aws_cdk import core

from cdk.pipeline_stack import PipelineStack


class MyAppConstruct(core.Construct):
    def __init__(self, scope, id, production=False):
        super().__init__(scope, id)

        PipelineStack(app, f"StaticWeb-{id}", production)

app = core.App()
MyAppConstruct(app, "dev")
MyAppConstruct(app, "stage")
MyAppConstruct(app, "prod", production=True)

app.synth()
Not only does it make it easy to add multiple environments in one go but now I could also use if/else logic on resources that might need more power or more redundancy in production.
Comments powered by Talkyard.